
Keeping your RV’s air conditioning running smoothly is pretty straightforward. The gist of it is staying on top of regular cleaning and inspection. Essential RV AC Maintenance Tips will help you understand what needs doing and how often, ensuring your RV stays cool and comfortable.
Safety Checks Before You Start
Before you lay a hand on anything, safety has to be your top priority. Make sure your RV’s roof is dry before you climb up there. If your RV has a non-walkable roof, you’ll need a stable ladder and some plywood to distribute your weight. It goes without saying, but disconnect your shore power and the 12V battery before you start messing with any electrical components. This isn’t just a suggestion; it’s essential for preventing shocks or damage.
For RV owners looking to ensure their air conditioning units are running efficiently, it’s essential to stay on top of maintenance tasks. A helpful resource that outlines a comprehensive approach to RV upkeep is the article on the monthly and seasonal maintenance checklist, which can be found at RV Maintenance Checklist: Monthly & Seasonal. This guide provides valuable insights into various RV ac maintenance practices, including those specifically related to the RV air conditioning system, helping you keep your vehicle in top shape for all your adventures.
Maintaining Your Air Filter
The air filter is your AC’s first line of defense. A dirty filter can dramatically reduce your unit’s efficiency.
Checking Your Air Filter
You’ll find your RV’s air filter usually just inside the RV itself, where the air intake is. It’s often a foam or mesh pad. Pull it out and give it a good look. Is it dusty? Does it look worn or torn? If it’s a reusable foam filter, it likely needs a cleaning. If it’s a disposable paper filter, time for a new one.
Cleaning or Replacing Your Air Filter
For reusable filters, a good wash with mild soap and water, followed by thorough drying, usually does the trick. Make sure it’s completely dry before you put it back. Disposable filters are a simple swap.
When to Clean or Replace
How often depends on your usage. If you’re out there camping in dusty areas a lot, check it monthly, maybe even weekly. For more typical use, inspecting and cleaning your filter twice a year – once in the spring before heavy use and then again in the fall – is a reasonable schedule. Inside the RV, look for dust build-up around the vents; that’s a good indicator it’s time for a filter check.
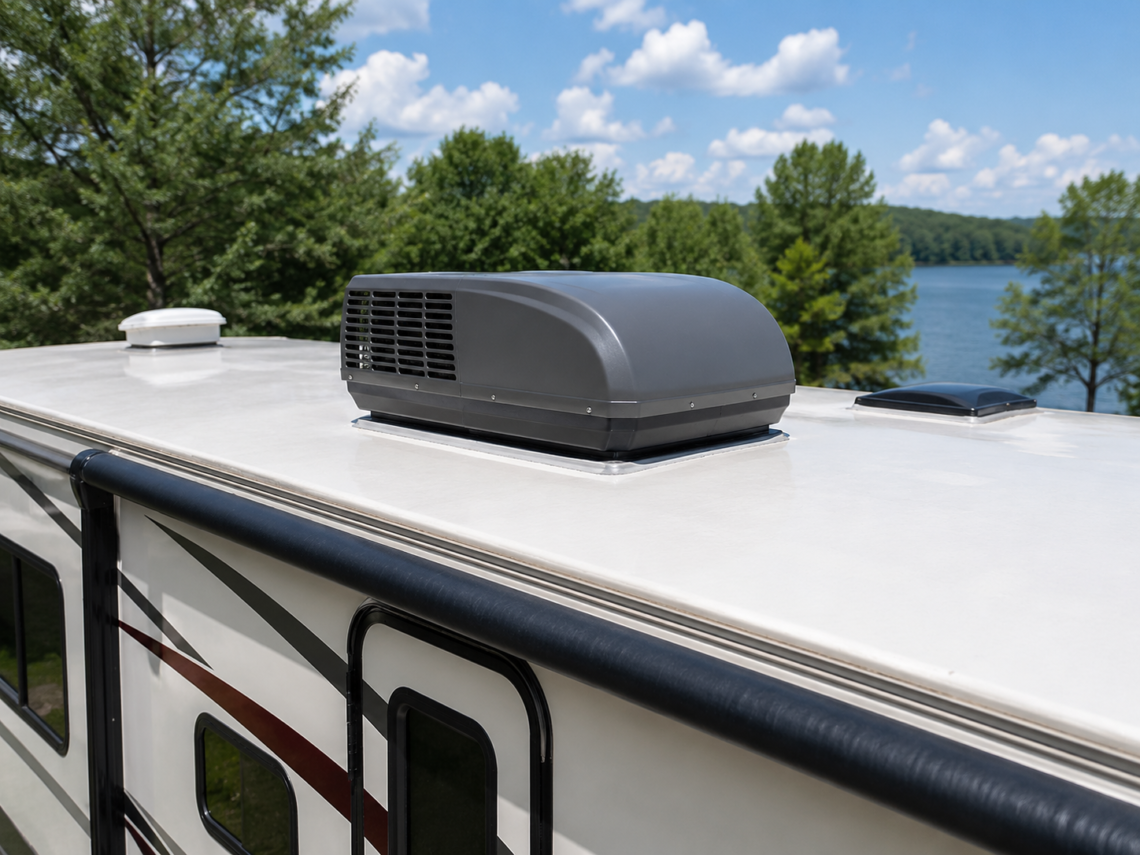
Cleaning the Rooftop Unit
The main part of your AC unit lives on the roof. This area collects all sorts of outdoor debris.
Removing the Shroud
The first step is to carefully remove the protective shroud that covers the rooftop unit. This usually involves unscrewing a few fasteners. Be gentle; these can sometimes be brittle from sun exposure. Once it’s off, you’ll have access to the inner workings.
Clearing Debris and Wiping Down Components
You’ll likely find leaves, twigs, dust, and even insect nests. Use a shop vac to clear out all this loose debris. A damp cloth can be used to wipe down the internal components, just be careful around electrical connections. The goal is to get rid of anything that might obstruct airflow or cause unnecessary wear.
Clearing Condensation Tracks and Drains
RV AC units produce condensation. There are tracks and drains designed to channel this water away. If these get clogged, water can back up, potentially leading to leaks inside your RV. Use a small pipe cleaner or even just compressed air to ensure these pathways are clear. You might also want to pour a little water down them to confirm they drain freely.
Coils and Fins Maintenance
The coils and fins are where the heat exchange happens. If they’re dirty or damaged, your AC won’t cool efficiently.
Inspecting and Cleaning the Coils
You’ll have an evaporator coil (inside the RV) and a condenser coil (on the roof). Both can get dirty. Use a soft brush or compressed air to gently remove dust and grime from both coils. There are also specialized coil cleaners available if they’re particularly gunked up, but follow the directions carefully. Aim to do this annually or semi-annually.
Straightening Bent Fins
The fins are the thin metal slats on the coils. They’re delicate and can easily get bent, often from cleaning or falling debris. Bent fins block airflow, reducing efficiency. You can use a fin comb, a specialized tool, or even a thin, stiff piece of plastic to carefully straighten any bent fins. Take your time with this; it’s a tedious but important step.
Proper maintenance of your RV’s air conditioning system is essential for a comfortable journey, especially during those hot summer months. Regular checks can help ensure that your AC runs efficiently, preventing unexpected breakdowns. For those planning a scenic road trip, understanding how to keep your RV in top shape is crucial. You might find inspiration for your travels in a related article that highlights some of the most breathtaking routes across the country. Check out this guide on 10 scenic RV drives in the USA you can’t miss to discover new destinations while keeping your RV well-maintained.
Checking Seals, Gaskets, and Cover
These components prevent water leaks and contribute to your AC’s overall efficiency.
Examining Roof Seals and Gaskets
The seal around the base of your AC unit, where it meets the RV roof, is crucial for preventing water intrusion. Inspect this area carefully for any cracks, gaps, or signs of wear. Similarly, check any gasket material for deterioration. If you notice any issues, address them promptly. Often, a specialized sealant or new gasket material is needed. Some RVers use foil tape as an added layer of protection around the base.
The Role of the Cover
The outer cover, the shroud you removed earlier, protects the internal components from the elements. If it’s cracked or significantly faded, it might be time for a replacement. Additionally, consider upgrading to a white cover if yours is a darker color. White reflects more sunlight, which can help keep the unit cooler, potentially reducing internal temperatures and improving efficiency.
Understanding and Testing Electrical Components
While some electrical checks might require a bit more comfort with tools, understanding these components is helpful.
The Capacitor
The capacitor is a little cylinder that gives your AC’s fan and compressor the initial jolt of power they need to start. If your AC struggles to start or hums without fully engaging, a failing capacitor is a common culprit. To test it, you first need to safely discharge it (they can hold a charge even when disconnected) using an insulated screwdriver with a grounded wire, then use a multimeter to check its capacitance against the specifications printed on the unit. It’s often a good idea to have a backup capacitor on hand, especially before a long trip. Ordering one in advance, specific to your AC unit, can save you trouble later.
Compressor Health
The compressor is the heart of your AC system. While a full diagnostic might be beyond basic DIY, you can get an idea of its health by checking its amp-draw. With a clamp-on ammeter, you can measure the current flowing to the compressor while it’s running. Compare this reading to the manufacturer’s specifications. A significantly higher or lower amp-draw could indicate a problem. Also, listen for unusual noises during its operation. The compressor should start and run smoothly.
Fan and Herm Terminals
The fan motor and compressor (often labeled HERM for hermetic compressor) have their own terminals where electrical connections are made. Visually inspect these terminals for any signs of corrosion, loose connections, or scorched wires. Loose or corroded connections can lead to increased resistance, power loss, and potential overheating. If you see any corrosion, carefully clean it off. If wires are scorched, it’s a sign of a more serious electrical issue and probably time to call a professional.
Recommended Maintenance Schedule
Staying on a regular maintenance schedule keeps small issues from becoming big problems.
General Timing
A good rule of thumb is to perform a thorough AC check every 6 months. This usually means a comprehensive maintenance session before the summer heat really kicks in, and then another in the fall after the really hot weather has passed.
Adapting to Your Environment
If you frequently travel through dusty environments, like desert regions or gravel roads, you’ll need to increase the frequency of your filter and coil cleanings. Dust isn’t just an efficiency killer; it can also contribute to wear and tear.
Pre-Hot Weather Checks
Before any anticipated hot weather, make it a point to perform a quick check. This includes ensuring all your vents are open and not blocked by anything (like stored items). This simple step ensures proper airflow right from the start.
Frequent Traveler Considerations
For those who use their RV almost constantly, particularly in warmer climates, a mid-season check-up is highly advisable in addition to the semi-annual maintenance. This will involve re-checking your filters, giving the rooftop unit a quick clean-out, and ensuring your condensation drains are still flowing freely. Paying attention to these details can prevent unexpected breakdowns when you’re far from home.
By following these proactive maintenance steps, you’ll extend the life of your RV AC unit and keep your travels comfortable, no matter the temperature outside.


3 Comments on “Essential RV AC Maintenance Tips”