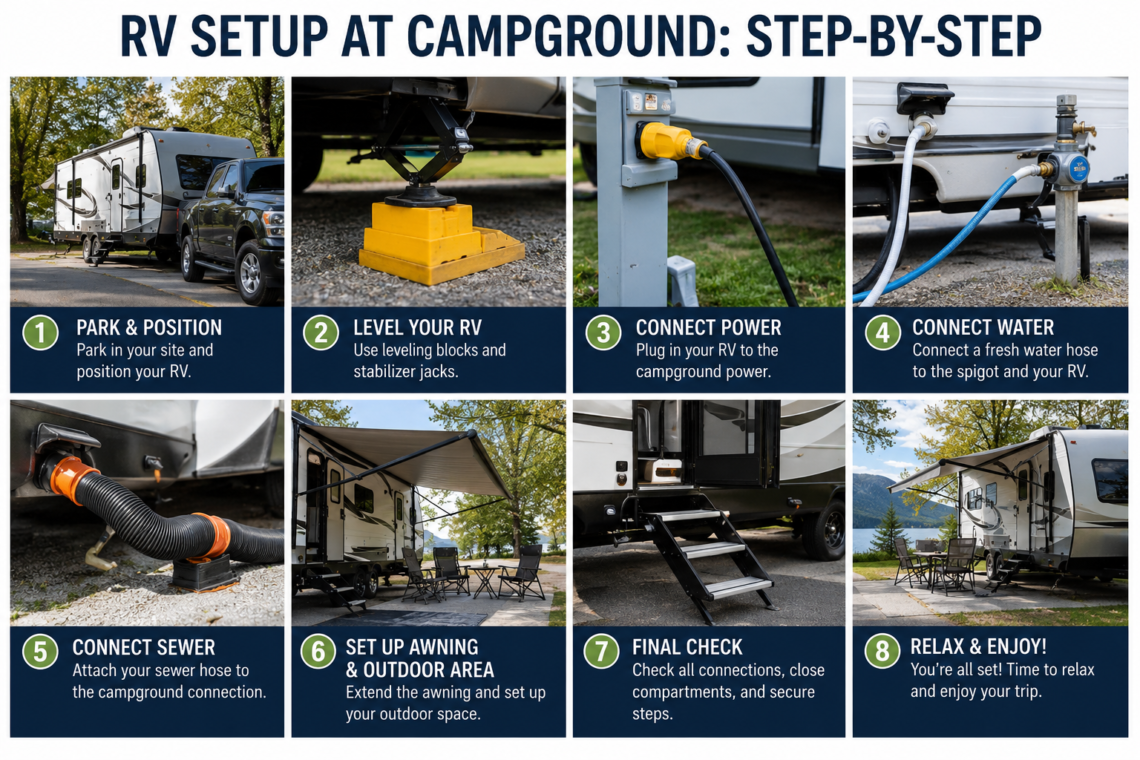
Getting your RV setup at the campground can feel like a bit of a dance when you’re new to it, or even when you’re a seasoned RVer trying out a new rig or a new park. The good news is, it’s pretty straightforward once you get the hang of it, and we’re going to break down every step for you. The main goal is to get your RV safely leveled, connected to utilities, and ready for you to relax. This guide covers everything from parking to power, so you can spend less time figuring things out and more time enjoying your trip.
Table of Contents
So, you’ve arrived at the campground and checked in. Now comes the important step of actually getting your RV into its designated spot. This isn’t just about pulling in; it’s about pulling in right to make the rest of your setup easier and safer.
Scouting Your Site
Before you even think about backing in or pulling through, take a moment to look at your site. A quick walk-through can save you a lot of grief.
- Pad Orientation: Is it a pull-through or a back-in? This determines your approach.
- Utility Pedestal Location: Where are the water, electric, and sewer hookups? You want to position your RV so your connections reach comfortably without needing extra-long hoses or cords, and without them stretching awkwardly across your campsite.
- Obstacles: Are there low-hanging branches, uneven ground, rocks, or picnic tables in the way? You might need to adjust your parking strategy to avoid these.
- Sun/Shade: Consider where the sun will be during the day, especially if you plan to extend your awning. Early morning sun on the bedroom can be a rude awakening, but midday sun on the awning side can provide welcome shade.
- Door Side: Make sure the entry door of your RV will open to a clear, usable space, ideally where your picnic table is located.
Backing In or Pulling Through
Once you’ve scouted, it’s time to actually park. This requires some focus, especially if you have a travel trailer or 5th wheel.
- Patience is Key: Don’t rush. Take your time, use your mirrors, and if you have a spotter, communicate clearly.
- Spotter Communication: If you’re lucky enough to have someone guiding you, establish clear hand signals beforehand. “Stop,” “more to the left,” “straighten up” – keep it simple and consistent. Some couples even use walkie-talkies.
- Angle for Success: For back-in sites, start by pulling past your site slightly and angling your RV so that the rear is pointing into the spot. This gives you room to maneuver.
- Watch Your Swings: Be mindful of the front corners of your RV (or tow vehicle for trailers) as you turn, especially for tight spots. Trailer tails can swing wide.
- Initial Positioning: Aim to park so your RV is roughly centered on the pad, allowing room for slide-outs (if you have them) and leaving enough space for your outdoor living area. Don’t worry too much about perfect positioning yet; we’ll refine that with leveling.
Leveling Your RV: The Foundation of Comfort
An un-level RV isn’t just annoying; it can cause your refrigerator to malfunction, your slide-outs to bind, and even make you feel a little queasy. Getting level is critically important and should be done before extending slide-outs.
Side-to-Side Leveling
This is the first type of leveling you’ll tackle, and it’s done using blocks or ramps under your wheels.
- Determine Slope: Use a level on the floor inside your RV, or a level app on your phone. You’ll primarily be looking at which side is lower. Many RVs have a permanent level installed on the outside or inside, often near the entrance door.
- Positioning Blocks/Ramps: Drive or back your RV onto leveling blocks (like Andersen Levelers, Lynx Levelers, or wood blocks) placed in front of or behind the wheels on the lower side.
- Trial and Error (Initial Pass): This can take a few tries. Put down blocks, pull/back onto them, check level. If not level, add more blocks or adjust. For travel trailers, you’ll need someone to guide you. For motorhomes, it’s a bit easier as you can check your level from the driver’s seat if you have a system or a quick walk inside.
- Parking Brake Engaged: Once side-to-side level, apply your parking brake. For travel trailers, chock the wheels on the side not on blocks to prevent any movement.
Front-to-Back Leveling (and Stabilizing)
With side-to-side done, you’ll now focus on front-to-back.
- Motorhomes: Most motorhomes (Class A, B, C) have hydraulic or electric leveling jacks. Once you’re side-to-side level, deploy these according to your RV’s manual. Often, there’s an auto-level function. If manual, extend the front jacks until level, and then the rear jacks until they just touch the ground (or lift slightly) to stabilize. Never lift your tires off the ground with hydraulic jacks unless specifically instructed by your manual.
- Travel Trailers/5th Wheels: This is where your tongue jack comes in. Once your wheels are chocked and you’re side-to-side level, operate the tongue jack (either manual crank or electric) to raise or lower the front of the trailer until it’s level front-to-back.
- Stabilizer Jacks: These are NOT for leveling. They are for stabilizing. Once you’re level side-to-side and front-to-back, extend your stabilizer jacks (usually four, one at each corner) until they are just firm against the ground. Don’t over-tighten, as you can lift the trailer off its leveling-blocks and throw it out of level again. They simply reduce sway and movement inside the trailer. If you have a scissor-jack type, use a drill with a socket adapter for easier operation.
Connecting Utilities: Power, Water, and Waste
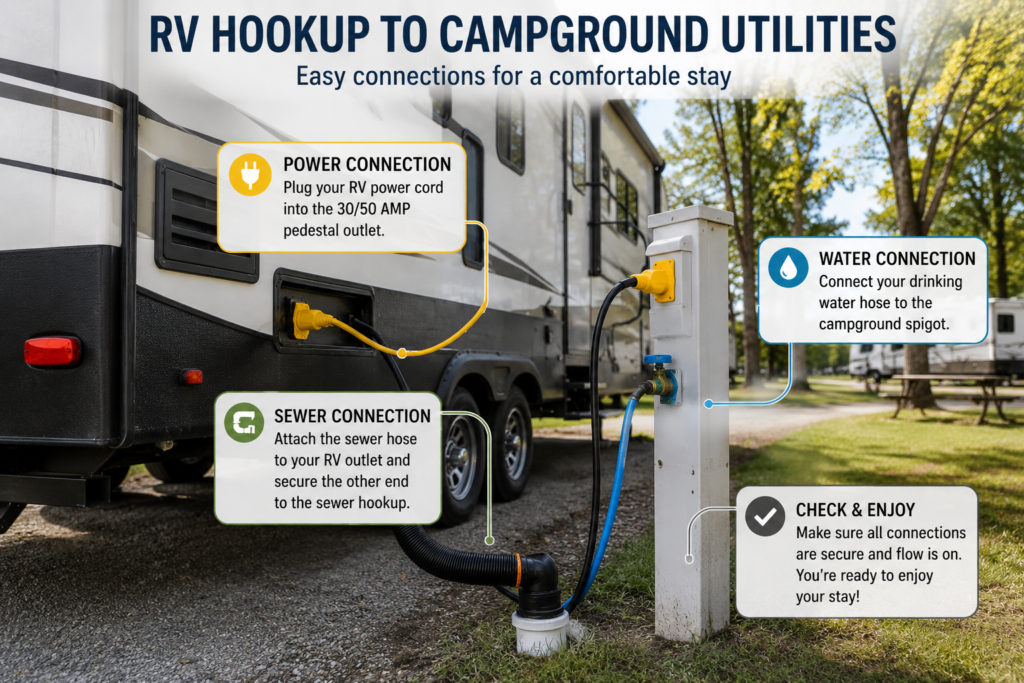
Now that your RV is securely parked and level, it’s time to bring it to life with the campground utilities. Always connect in a specific order for safety and efficiency.
Electrical Connections
Getting power safely into your RV is crucial. Always inspect the pedestal first.
- Check the Pedestal: Before plugging anything in, look at the campground’s electrical pedestal. Are there any scorch marks? Is the outlet loose? If it looks iffy, report it to the office.
- Surge Protector/EMS: This is an absolute must-have. Plug your surge protector (or Electrical Management System – EMS) into the pedestal first. This device protects your RV from power surges, low voltage, and miswired pedestals. Give it a moment to check the power.
- Match Amperage: Ensure you’re plugging into the correct amperage outlet for your RV (30-amp or 50-amp). Never force a plug. Use an adapter only if you’re stepping down, e.g., using a 50-amp RV on a 30-amp pedestal with an adapter. Never plug a 30-amp RV into a 50-amp outlet without a proper adapter; it can damage your RV’s electrical system if the pedestal isn’t wired correctly.
- Turn Off Breakers: Before plugging your RV power cord into the surge protector (or directly into the pedestal if you don’t have a surge protector, which is not recommended), turn off the breakers on the pedestal.
- Plug in your RV: Connect your RV power cord to the surge protector/pedestal. Ensure it’s a tight, secure connection.
- Turn On Breakers: Once everything is plugged in securely, flip the breakers on the pedestal on.
- Check Inside: Go inside your RV and make sure lights and appliances are working. Often, you’ll hear the air conditioner hum or the refrigerator start up.
Water Connections
Accessing fresh water is generally the next step.
- Water Regulator: A water pressure regulator is just as important as a surge protector. Campground water pressure can vary wildly, and high pressure can damage your RV’s plumbing. Connect your water pressure regulator to the campground spigot first.
- Water Filter: If you use an external water filter (highly recommended for taste and safety), connect it to the outlet side of your pressure regulator.
- Attach Hose: Connect your fresh water hose (white or blue, designated for potable water) from the filter to your RV’s “city water” inlet.
- Flush the Line: Turn on the campground spigot slowly. Let water run through the hose and filter for a few moments before connecting to your RV. This flushes out any air and loose particles.
- Check for Leaks: Watch for leaks at all connection points.
- Open Faucets: Go inside and open up a cold water faucet in your RV to allow air to escape the lines. Once water flows steadily without sputtering, close the faucet.
- Fill Fresh Tank (Optional): If you plan to boondock later, or just want to have an emergency supply, you can use a separate hose or bypass the city water connection and fill your fresh water tank through your “fresh water fill” inlet. Remember to turn off the water when the tank is full to avoid overflow. Don’t leave your fresh tank fill valve open if you’re on city water, or you’ll fill and potentially overflow your fresh tank.
Sewer Connections
This is perhaps the least glamorous but equally important connection.
- Gather Supplies: You’ll need a sewer hose, clear elbow (highly recommended), and potentially a sewer hose support (often called a “slinky”).
- Position Hose Support: If using a sewer hose support, set it up first, creating a gentle slope from your RV’s sewer outlet to the campground sewer connection.
- Connect to RV: Attach the clear elbow to your RV’s black/grey tank drain outlet. Then, connect your sewer hose to the clear elbow.
- Connect to Campground: Securely insert the other end of your sewer hose into the campground’s sewer connection. Use a rubber doughnut or threaded connector if available to create a tight seal and prevent odors.
- Keep Valves Closed: Ensure both your black and grey tank valves are closed at this point. You do not want them open continuously, as this leads to a phenomenon called “pyramiding” where solids build up in the black tank.
- Drain Order: Always drain your black tank first (when it’s at least two-thirds full), then drain your grey tank. The grey water (from sinks/shower) will help wash out the sewer hose, leaving it cleaner.
- Rinse (Optional but Recommended): If your RV has a black tank flush system, connect a separate hose (not your fresh water hose!) to the flush inlet and run water for a few minutes after draining the black tank.
- Close Valves: Once draining is complete, close both black and grey tank valves.
- Clean Up: Disconnect your sewer hose, rinse it with water (again, not your fresh water hose), cap both ends, and store it in its designated compartment. Use gloves!
Getting Settled: Slide-outs, Awning, and More
With the core connections made, it’s time to really make your RV feel like home. These steps help with comfort and expands your living space.
Deploying Slide-outs
Many modern RVs have slide-outs that dramatically increase interior space.
- Check for Obstacles: Before deploying, always do a visual check outside for trees, picnic tables, utility pedestals, and anything else that might obstruct the slide-out’s path.
- Check Inside: Ensure there’s nothing inside that will get pinched or damaged as the slide extends. Lock cabinet doors if necessary.
- Level First: Crucially, your RV must be level before extending slide-outs. Extending them on unlevel ground can twist the frame and cause mechanical issues or leaks.
- Extend Slowly: Use the control panel to extend your slide-outs. Listen for unusual noises. If you hear anything concerning, stop and investigate.
- Seal Check: Once fully extended, walk around and visually inspect the seals on the outside of the slide-out to ensure they are properly seated and not pinched.
Setting Up Your Awning
Your awning provides valuable shade and shelter, expanding your usable outdoor space.
- Check Wind Conditions: Awnings are susceptible to wind. If it’s breezy or expected to get windy, consider holding off or retracting it if you’ve already deployed it.
- Clear the Area: Make sure there are no branches or obstructions that the awning will hit as it extends.
- Extend Slowly: Use the manual crank or electric switch to extend the awning. Listen for any binding or odd noises.
- Angle for Drainage: If rain is expected, set one side of the awning slightly lower than the other to allow water to run off, preventing pooling that could damage the fabric or mechanism. Many electric awnings retract automatically in high winds or standing water, but it’s good practice to monitor.
- Secure (If Manual): For manual awnings, ensure the support arms are locked into place. You might also want to tie it down with awning straps in light breezes.
Other Comforts
These smaller steps make a big difference in your camping experience.
- Antenna/Satellite: If you plan on watching TV, extend your TV antenna (crank-up or automatic) and scan for channels. If you have a portable satellite dish, set it up and orient it.
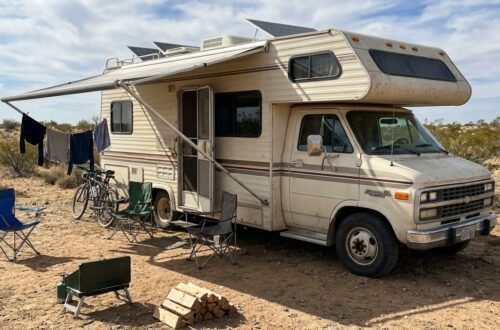
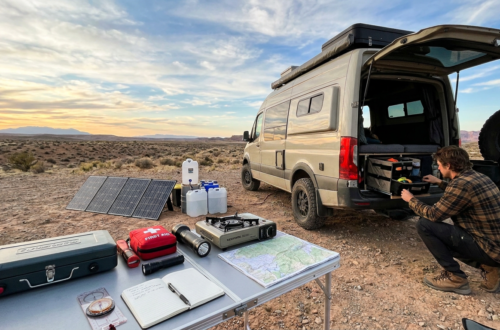
- Outdoor Living: Set up your camp chairs, outdoor mat, portable grill, or any other items that make your campsite feel like home.
- Chocks/Stabilizers Re-check: Double-check that your wheel chocks are secure and your stabilizer jacks are firmly in place, especially if you moved around inside the RV during setup.
- Lock Things Up: Before leaving the campsite, make sure all storage compartments are locked, and your RV door is secure.
When preparing for a successful RV camping experience, understanding the setup process at a campground is crucial. A comprehensive guide can help you navigate this task step-by-step, ensuring that you make the most of your time outdoors. For those interested in maintaining their RV’s functionality, you might find it beneficial to read an article on essential tips for RV slide-out repair, which can enhance your overall camping experience. You can check it out here. Proper setup not only maximizes comfort but also ensures that your RV operates smoothly throughout your trip.
Final Walk-Around and Enjoyment
| Step | Description |
|---|---|
| 1 | Choose a suitable campsite for your RV |
| 2 | Level your RV using leveling blocks or jacks |
| 3 | Connect your RV to the campground’s electrical hookup |
| 4 | Hook up your RV to the campground’s water supply |
| 5 | Connect your RV to the campground’s sewer system |
| 6 | Set up any outdoor furniture or equipment |
| 7 | Enjoy your camping experience! |
Before you kick back, a quick final check can prevent headaches later.
The “Once Over”
- All Connections: Quickly check all utility connections (electric, water, sewer) again for any loose fittings or drips.
- Seals and Gaps: Look around your slide-outs and windows to ensure everything is properly sealed and closed.
- Under the RV: Make sure nothing is dragging or hanging loosely, and that your tires look good.
- Storage: Confirm all outdoor storage bays are closed and locked.
Relax and Explore
Congratulations! Your RV is fully set up. Now it’s time to truly unwind. Explore the campground, take a walk, start a campfire, or simply sit back and enjoy the peace and quiet. The whole point of RVing is to enjoy the journey and the destination, and a smooth, safe setup is the first step to making that happen. Happy camping!
FAQs
1. What are the basic steps for setting up an RV at a campground?
To set up an RV at a campground, start by leveling the RV, connecting to the campground’s electrical hookup, water hookup, and sewer hookup. Then, extend the slide-outs, set up any outdoor furniture, and secure the awning if applicable.
2. How do you level an RV at a campground?
To level an RV at a campground, use leveling blocks or ramps to raise the low side of the RV until it is level. Use a bubble level to check for levelness in both directions, and adjust as needed.
3. What is the process for connecting to the campground’s electrical hookup?
To connect to the campground’s electrical hookup, first, make sure the power pedestal is turned off. Then, plug the RV’s power cord into the pedestal, and turn on the power. Check the power supply with a surge protector to ensure it is safe for use.
4. How do you connect to the campground’s water hookup?
To connect to the campground’s water hookup, attach a drinking water safe hose to the water source and the RV’s water inlet. Turn on the water supply and check for any leaks. Use a water pressure regulator to protect the RV’s plumbing system from high water pressure.
5. What are the steps for connecting to the campground’s sewer hookup?
To connect to the campground’s sewer hookup, attach a sewer hose to the RV’s waste outlet and the campground’s sewer connection. Make sure the hose is secure and sloped downward to allow for proper drainage. Open the RV’s waste valves to empty the tanks, then close the valves and flush the system with water.