
So, your RV slide-out is giving you trouble? It happens. These extendable living spaces are fantastic for maximizing your room on the road, but they also introduce more moving parts and potential for issues. The good news? Most common RV slide-out repair tasks are manageable for the DIY-minded RVer.
Keeping a Watchful Eye on Your Slides
Regular preventative maintenance is key to avoiding bigger headaches down the line. Think of it like checking the oil in your car – a simple task that can save you from a costly breakdown. Your RV slide-outs are no different. Little things, noticed early, can prevent major repairs.
Monthly Hardware Checks
Once a month, take a few minutes to inspect all the screws and hardware holding your slide-outs together. This goes for both the internal mechanisms and the external trim pieces. You might be surprised at how often screws can loosen up due to road vibrations. A common scenario, observed in RVs like some Grand Design Reflections, is seeing screws start to back out. If you catch this early, a simple tightening with the correct screwdriver or nut driver is usually all it takes.
- What to look for: Any screw that appears loose, is sticking out further than it should, or has started to wiggle.
- What to do: Tighten them up. If a screw hole has become a bit enlarged or stripped, don’t just keep tightening. Consider using an oversized screw or even a screw with anchors designed for wood. This creates a more secure fit and prevents further damage, like chipping the surrounding material.
Seal Integrity: Your First Line of Defense
The seals around your slide-outs are critical. They keep the elements out – rain, dust, bugs – and your climate control in. Neglecting them is a fast track to water damage and other issues.
- Regular Cleaning Routine: Make it a habit to clean your seals every month. Use a mild soap and water solution. This removes dirt, grime, and any buildup that can degrade the rubber over time.
- UV Protection: After cleaning, apply a UV protectant specifically designed for rubber seals. This is crucial for preventing them from drying out, cracking, and becoming brittle. Gently wipe the protectant into the seals. You’re not trying to remove it all, just ensure it penetrates. This is especially important for through-frame slide-outs where the seal can be more exposed.
- Rubber Conditioner: Alongside UV protectants, consider using a rubber conditioner. This helps keep the seals supple and flexible, maintaining their sealing capabilities.
If you’re looking for comprehensive guidance on maintaining your RV, including tips on slide-out repairs, you might find the article on RV maintenance particularly useful. It covers essential checks and procedures to ensure your RV remains in top condition for worry-free travel. For more information, you can read the article here: RV Maintenance Checklist for Safe, Worry-Free Travel.
Slide-Out Roof Maintenance: Above and Beyond
The roof of your slide-out is a smaller version of your RV’s main roof, and it needs similar attention, especially where it meets the slide mechanism.
Clearing Debris
Think about what weather can do. Leaves, twigs, dirt – they all gather on and around your slide-out, particularly if you’re parked under trees.
- Gentle Sweeping: Use a soft broom to clear away any debris from the slide-out roof. Be gentle to avoid scratching the surface or damaging seals.
- Addressing Cracks: If you see any small cracks or imperfections in the sealant on the roof edge or where it meets the slide mechanism, address them promptly. A good quality sealant designed for RV roofs can patch these up and prevent water intrusion.
- Waxing: Applying a quality RV wax to your slide-out roofs twice a year – typically in the spring and fall – adds an extra layer of protection against the elements and makes cleaning easier.
- Topper Installation: If your RV doesn’t already have them, consider installing slide-out toppers. These fabric awnings extend when the slide-out is out and retract when it’s in, sitting over the slide-out roof and providing excellent protection from rain, snow, and debris.
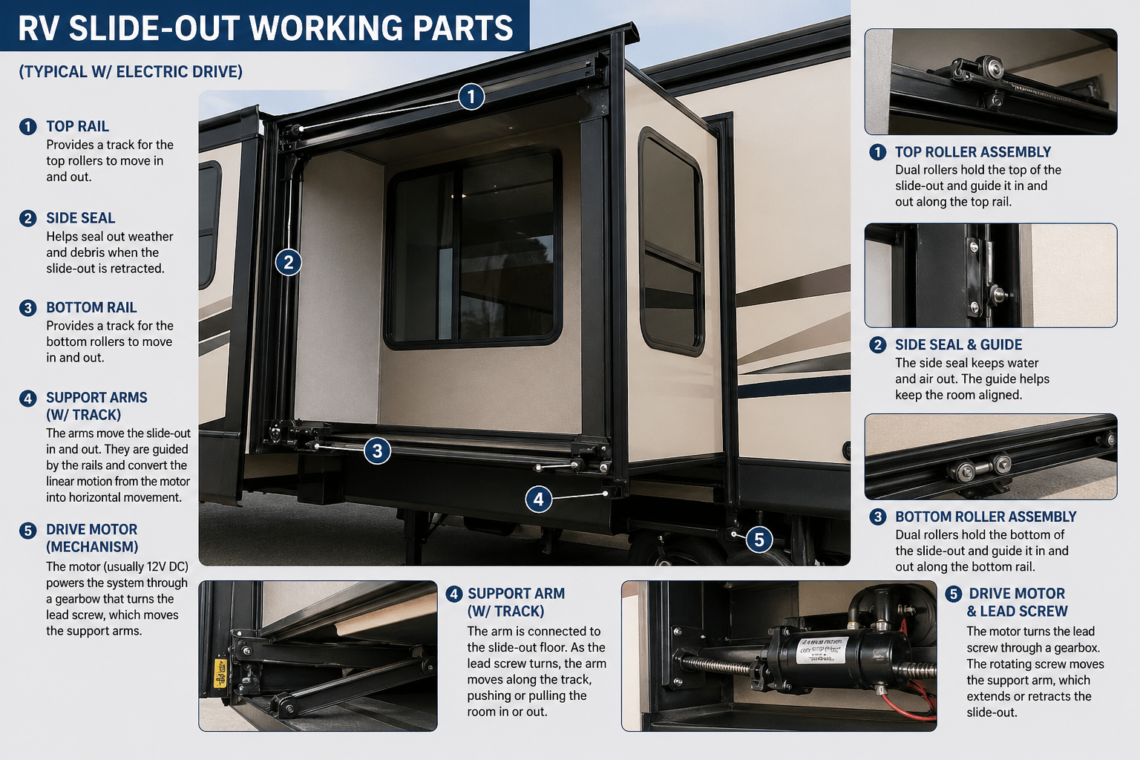
The Slide-Out Tracks and Gears: Keeping Things Moving Smoothly
The mechanical heart of your slide-out lies in its tracks and gears. Keeping them clean and properly lubricated is vital for smooth operation.
Lubrication Strategy
This is a place where “less is often more” applies. You want lubrication, but not so much that it becomes a dirt magnet.
- Clean First: Regularly clean the tracks where the slide mechanism operates. Use a damp cloth to remove any accumulated dirt or grit.
- Gear Inspection: Once a year, it’s a good idea to inspect the gears for any visible wear or damage. If you see an issue, it’s often best to consult a professional.
- Dry Lube Only: For lubrication, a dry silicone lubricant is usually the best choice. Apply it sparingly to the tracks. The goal is to create a smooth gliding surface. Avoid over-applying, as excess lubricant can attract dirt and dust, which can clog the tracks and impede movement.
When Your Slide-Out Won’t Move: Troubleshooting Steps
This is where panic can set in, but a systematic approach usually reveals the problem. Before calling for expensive mobile repair, try these steps.
The Power Puzzle
Slide-outs are electrically powered, so the first thing to check is your power supply.
- Battery Charge: Is your RV battery adequately charged? A low battery can cause the slide-out motor to struggle or not move at all. Check your battery voltage or try running your generator or shore power.
- Motor Function: Listen for any sounds from the slide-out motor. If you hear a humming or clicking but no movement, it could indicate a problem with the motor itself or the drive system. If you hear nothing, it could be a power issue, a tripped breaker, or a problem with the switch.
- Breaker Check: Locate your RV’s main breaker panel and check for any tripped breakers that correspond to the slide-out system. Reset them if necessary.
Alignment is Key
The tracks need to be aligned properly for the slide-out to move smoothly.
- Visual Inspection: When the slide-out is fully retracted or extended, visually inspect the tracks on both sides. Are they parallel? Do you see any obvious signs of misalignment, such as one side appearing higher or lower than the other?
- Obstructions: Sometimes, something as simple as a small rock or piece of debris can get lodged in the track and prevent movement. Carefully inspect the entire length of the track for any obstructions.
- Manual Override: If you’re comfortable and have the necessary tools, many RV slide-outs have a manual override system. This usually involves a crank or a specific tool that allows you to manually extend or retract the slide-out. Consult your RV’s owner’s manual for instructions specific to your model. This can be a lifesaver if the motor fails completely, but be prepared for manual operation to be slow and require some effort.
If you’re looking to maintain your RV in top condition, understanding the importance of regular slide-out maintenance is crucial. For a comprehensive guide on essential annual tasks for your RV, you might find this article helpful. It covers various aspects of RV upkeep that can enhance your travel experience. Check out the details in this related article to ensure you don’t overlook any important repairs or maintenance tasks.
Supporting Your Slide-Outs When Extended
If you plan to spend extended periods in your RV, or even just want to ensure the long-term health of your slide-outs, proper support when extended is a good idea.
Full-Time Living Considerations
Living in your RV full-time means your slide-outs are likely deployed for long stretches. This puts continuous stress on the mechanism and the structure.
- Adjustable Supports: For sustained deployment, consider using adjustable, heavy-duty supports. These are typically placed on stable, level ground beneath the outward-facing edge of the slide-out.
- Seasonal Re-leveling: The ground underneath your RV can shift with the seasons. Re-level your RV and adjust your slide-out supports accordingly at least twice a year.
- Quarterly Adjustments: Even outside of seasonal changes, it’s wise to check and adjust your slide-out supports quarterly. This ensures they are still providing optimal support without putting undue stress on the slide-out itself. Don’t over-tighten; the supports are there to bear weight, not to force the structure into position.
Examining the Underside and the Box Structure
The actual “box” of your slide-out, and what’s happening underneath it, is just as important as the moving parts.
Maintaining the Box Integrity
Don’t forget to look at the slide-out from underneath and the inside wall where it meets the main RV body.
- Floor Condition: Periodically, get on your hands and knees and inspect the floor of the slide-out. Is it solid? Are there any signs of delamination or water damage?
- Bolt Tightness: Beneath the slide-out, you may find bolts that secure the mechanism or the framing. Ensure these are tight. If you see any that are loose, tighten them.
- Sweep Condition: The sweeps are the flexible strips of material that help seal the gap between the slide-out and the RV wall when it’s extended. Check these for damage, tears, or wear. Damaged sweeps can let in water and debris.
- Sealant Touch-ups: Where the slide-out wall meets the main RV body, there’s sealant. This is another area where water can infiltrate. Check for any cracks or gaps in the sealant and touch them up as needed.
- Roof Membrane Patches: If your slide-out has a roof membrane (similar to the main RV roof), inspect it for any tears or punctures. Small issues can be patched with appropriate RV roof repair materials. Addressing these cosmetic issues with the box structure proactively prevents larger, more expensive water damage problems.


One comment on “Essential Tips for RV Slide Out Repair”